Pork and Pickles

These are a few of my favorite things


1 Comment

I Have Found My Mojo!

It was a rough late winter and spring here. I sort of ran into a wall with regard to food – I couldn’t muster the enthusiasm to make it, much less write about it. Something’s kicked me into gear the last few days (I have some theories as to what it could be…) and FOOD IS GETTING MADE around here.

I received a gorgeous handmade deep dish pie pan for my birthday, as well as some absolutely ridiculous 3D printed cookie cutters – both of those gifts will more than likely be getting used today. I’ve got my standard whole wheat buttermilk bread rising now.

I made Smitten Kitchen’s Rhubarb Snacking Cake on Friday and it was, as are all of her recipes, FANTASTIC. Somehow there are still a couple pieces of it left, but not for long.

Last night I made rhubarb ginger syrup (with rhubarb from my yard! YAY!), based on this recipe, though we decided at the end that it needed about 1/2 cup more sugar to balance the astringency of the rhubarb. It was pretty much awesome mixed with some Pimm’s and I *think* gin (mixology is not my department) and some soda water.

OH. And last week there was pickled asparagus made. I haven’t cracked into it yet, but it looks tasty! Recipe here.

NOM NOM NOM

NOM NOM NOM

Here’s hoping I’ll be able to maintain this enthusiasm and get more fun stuff done!


Leave a comment

Fermented Carrot Pickles

I stumbled across a recipe for fermented carrots the other day (here) – what a great idea! We have a lot of carrots left from the CSA share and while we’ve been eating raw carrots with dinner quite frequently I thought it would be nice to do something different with them. And after discovering how much I like the kimchi I made in October, I’ve been thinking about making lots of fermented pickly foods.

This is pretty simple, like most fermented pickles. Slice the veggies, mix with salt and squeeze/pound them to break down cell walls and get the juices flowing. Add flavoring agents and work them in some more, then pack everything into a jar and let it sit for a couple weeks.

I set the blade on this thing to give me 1/8" slices.

I set the blade on this thing to give me 1/8″ slices.

I opted to use my mandoline to slice the carrots since I was cutting up so many. I love this thing, but the blade is super sharp – don’t get cocky using it! I sliced my thumb pretty badly last year and am now more than a little afraid of it. They sell them with blade guards for a reason!  You can absolutely do this with a knife, but it’s going to take a lot longer and you’ll have more inconsistent slices. Neither of which is going to negatively affect the finished product, for the record!

I ended up with about 8 cups of sliced carrots, which was probably about 12-15 medium carrots. I tossed them with a couple tablespoons of kosher salt and then mixed and squeezed the heck out of them. Then I sliced up a few cloves of garlic and grated a 3″ piece of ginger and mixed those into the carrots, squeezing some more. I also added a couple dried peppers, probably cayenne, from which I’d removed the seeds and then crushed in my hands. This part’s totally optional, as are the garlic and ginger, but will contribute a whole bunch of delicious flavor!

Mixed and squeezed!

Mixed and squeezed!

After all that squeezing, you should have  a bit of liquid coming out of the carrots. At this point I didn’t have anywhere near enough liquid to cover the carrots once they were stuffed into a jar, plus I had to leave the house for a while, so I just covered the bowl with plastic wrap and let it sit for a few hours while the salt did its thing, drawing more liquid out of the carrot slices.

I sanitized a regular mouth quart jar, #12 stopper, and airlock (from Northern Brewer), stuffed all of those carrots in, making sure to press them down so everything was under the liquid, and popped the stopper and airlock in. It’ll sit on the counter for a couple weeks, until it stops bubbling, and then I will eat them!

Go baby go!

Go go lactofermentatio!

If you don’t want to deal with an airlock, you can also just put some salt water in a ziplock bag and fit it into the mouth of the jar. That’ll help keep everything submerged and still allow excess gases to escape. You *can* just ferment it with a lid on too, but you’ll want to vent the jar every day or two. Trust me.

Fermented Carrot Pickles

  • 8 cups thinly sliced carrots (10-15 medium carrots)
  • 2 TB kosher salt (use about 1/2 that volume if using finer-grained salt)
  • 3 cloves garlic, sliced thinly
  • 3″ piece ginger, peeled and grated
  • 1 tsp crushed pepper flakes, more or less to taste (or use fresh minced chilis) (optional)

In a large bowl, mix carrots and salt and squeeze or pound until carrots begin to exude juices. Add ginger, garlic, and pepper and squeeze some more. Cover bowl with plastic wrap and let sit for 3-4 hours, then pack into sterilized jar and seal with stopper/airlock or a baggie of salt water.


1 Comment

The Taste That Tastes Back

Sometimes I make the oddest impulse purchases. Last week it was a beef tongue that happened to catch my eye. After a brief conversation with the butcher to find out if it had been peeled (it had) and how he liked to cook it, I took it home and left it to thaw. Since the cow’s tongue does a lot of work, it’s a cut of meat that needs to be cooked low and slow, making it a perfect candidate for the slow cooker. Seeing as my new stove hadn’t yet arrived I couldn’t go with my faster slow-cooking technique, where everything goes into an oven-safe pot and I bring it to a boil on the stovetop, then throw it in a low oven for a few hours. The slow cooker turned out to be a better option anyhow, since I had to be out of the house for a good chunk of the day.

Mise en place!

Mise en place!

After a little research, I threw the tongue into the slow cooker with a chopped onion, a whole lot of crushed garlic cloves, some bay leaves, peppercorns, and salt. I think it would have been perfectly fine with just salt and garlic, to be honest – the aromatics mostly just made the house smell good. I left it to cook on low until it was tender, which was probably 6-8 hours.  When it was done I had a slight accident with the slow cooker insert and ended up spilling tongue broth all over the pantry counter and, horrifyingly, inside part of the window. Once I’d recovered from cleaning that up, I was done with the project for the night and had a beer for dinner instead of tongue. Luckily, I hadn’t dumped the entire batch of broth and could just strain it and refrigerate the tongue in its cooking liquid.

La lengua de res es muy deliciosa.Yes, I'm aware of how terrible my Spanish grammar is.

La lengua de res es muy deliciosa.Yes, I’m aware of how terrible my Spanish grammar is.

Last night we needed a quick dinner and tongue tacos (or tacos de lengua, as I generally call them because some people get squicked out when you tell them you’re eating TONGUE. And also because it makes me feel like I remember a little more high school Spanish than I really do) sounded like the absolute perfect solution. I pulled the meat out of its cooking broth (which I ended up discarding), sliced it up, and fried it in a little oil until some of the slices were a bit browned.

Warming through and getting a little bit browned. (Note the spiffy new stove!)

Once the meat had heated through and browned a little, Chris chopped it up for me and then we piled the chopped tongue into warmed tortillas and topped it with sliced radishes, cilantro, and some salsa. I’d have added lime juice if we’d had any, but the salsa we had on hand has pineapple in it, which took care of the fruitiness and acidity.

Tacos de lengua are, without a doubt, my favorite kind of tacos.

Tacos de lengua are, without a doubt, my favorite kind of tacos.

 I wish I’d bought a larger tongue (or more than one) because this was so very good. I’d love to eat it for lunch and dinner today but had to content myself with the leftovers for breakfast this morning with a fried egg. It was definitely a good treatment for my hangover. Oh, and the kids refused to eat this. I talked them both into trying a tiny bite of the cooked tongue while it was still cold, which was a mistake because they hated it so much they refused to try it hot. Next time I just won’t tell them what it is until after they’ve eaten it.

Tacos de Lengua

  • One beef tongue
  • 1 small onion, chopped (optional)
  • 5-6 cloves garlic, peeled and chopped
  • 2 bay leaves (optional)
  • 10-15 peppercorns (optional)
  • 1 tsp salt (NOT optional)
  • lard/canola oil
  • corn tortillas
  • sliced radishes
  • cilantro
  • salsa (salsa verde/tomatillo salsa would be fantastic with this)
  • lime juice

Place tongue, onions, garlic, bay leaves, peppercorn, and salt in slow cooker and cover with cold water. Cook on low until the tongue is tender, 6-8 hours, depending on the size of the tongue. Remove from slow cooker and strain and reserve cooking broth. The tongue can be refrigerated in the broth until you’re ready to use it, or else proceed as follows. If the tongue was not peeled, you can easily peel the skin off now using your fingers and a small knife.

In a heavy pan, heat a tablespoon or so of lard or oil over medium heat. While the pan is heating, slice the tongue in 1/8″ slices (this is much easier when it’s cold). Fry the slices on both sides until they’re warmed through and slightly browned, then dice them up. Serve in warmed corn tortillas with salsa, sliced radishes, lime juice, and cilantro. ENJOY!


Leave a comment

Cooking By The Seat Of Your Pants

“Cooking by the seat of my pants” is a concept I’ve been thinking about a lot lately. It’s a skill I started to hone when I was young and broke and vegetarian and worked at the grocery store – I saw my customers buying interesting fruits and vegetables and knew which staple goods were cheapest. I’d come home with a bag full of canned beans and whatever (canned) vegetables had caught my eye, plus the quinoa I had just discovered, look at my purchases, and say “What the hell am I going to make with this??” I’d cook the quinoa, dump in a can of beans and tomatoes (or corn, generally), mix in powdered garlic, and call it a couple days’ worth of lunch.

My ingredient choices and cooking skills have evolved a bit from that point, but this is still a skill I practice regularly. I put it to use at work when it was my turn to make the soup of the day or when I had a bin full of frozen bananas and needed a dessert. I put it to further use when I started shopping at the farmer’s market and came home with a giant box of tomatoes and red peppers. And these days when our CSA is in full swing and we’ve got a freezer full of pork and beef, I have to figure out how best to use stuff up before it goes bad but also keep in mind that I have three other people in this house who can be some of the toughest customers ever.

On top of the usual reasons I cook this way, this week I have an additional reason – our oven died! While I’m waiting for the new (fancy sexy exciting) one to be delivered, I’ve challenged myself to focus on making meals that are made on the stovetop or crockpot rather than looking for things that can be done without an oven. It’s a minor distinction, and perhaps it might not make much sense to some people, but I do much better with a challenge when it’s framed the right way. I have a tendency to focus on what I *can’t* do and don’t want to head down the road of being unable to cook anything because I only want to eat things that require the oven (bread and cookies, for example).

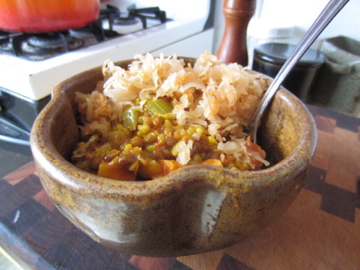
I’ve been craving hearty winter foods lately, specifically this lentil dish that a friend had once brought to a party. I never got her recipe and haven’t been able to replicated it, so the memory of that dish had been stashed away on a dusty shelf in my mind. Something knocked it loose and it’s been underfoot all week. I checked the pantry and found a bag of french green lentils, also called lentils du puy, rather than the brown lentils that the were in the original dish. I grabbed some brown rice, which seemed like a good addition to what I remembered. I found carrots and celery in the fridge onions and garlic and a jar of tomatoes in the pantry. And curry powder, because it sounded perfect. I wanted coconut milk but was out, which ultimately was for the better – it would have been far too rich (but so tasty!) with the delicious delicious coconut milk. Everything pretty much just went into the pot together, along with a whole bunch of water, and simmered until it was all cooked and delicious. And because I was scavenging in the pantry, I pulled out a jar of the kimchi I’d made last fall, and put a bunch of that on top. I ended up with a huge pot full of this stuff and might just eat it all myself rather than share – it turned out to be exactly the food I’ve been craving while not tasting much at all like the food memory I was shooting for.

LUNCH!

LUNCH!

Lentils du Puy with Brown Rice and Vegetables

  • 2 TB coconut oil (substitute butter/lard/oil at will)
  • 1 onion, diced
  • 2 ribs celery, diced
  • 2 carrots, quartered and cut into 1/4″ chunks
  • 3 cloves garlic, chopped
  • 2 TB sweet curry powder (my favorite kind)
  • 1 quart home-canned tomatoes (or the equivalent in fresh, frozen, or commercially canned tomatoes), liquid included
  • 1 cup french green lentils, rinsed
  • 1 cup short-grain brown rice
  • water
  • salt

In a 3-quart or larger pot, heat oil over medium heat. Add chopped onion and cook over low heat until it starts to become translucent. Add celery, carrots, and garlic and cook for a few more minutes. Stir in curry powder and cook until it becomes fragrant, then add lentils, rice, and tomatoes. Add water to cover everything and bring up to a boil. Lower heat to a low simmer and cook, stirring periodically, until the rice and lentils are tender. You will probably need to add more water at some point – I ended up adding a total of about 5 cups of water in addition to the liquid from the tomatoes. Season to taste with salt and serve. I found the addition of kimchi to be delightful, but I know it’d be great with a dollop of yogurt or no topping at all.

Chopped cabbage would be a delightful addition to this recipe, if you had it on hand, as would spinach, kale, or some other hearty green. Modify to your heart’s content, omitting the curry and substituting in whatever spices or herbs you have on hand.


2 Comments

Whole Wheat Pumpkin Chocolate Chip Muffins

Who doesn’t love pumpkin chocolate chip muffins? Nobody in my family, that’s for sure. And for a family where only half the members like winter squash, this is impressive. I’ve been using this recipe from King Arthur Flour Whole Grain Baking for a few years now and it’s always given me good results, unlike some of the other recipes in that book. I prefer to eat baked goods that are made with whole grains, but some things really are better with white flour (birthday cake, I’m looking at YOU).

But pumpkin and whole wheat? Match made in heaven. Add chocolate chips and well, how can it be anything but amazing? Don’t answer that. I know how.

The cast of characters

The cast of characters: whole wheat flour, leaveners, spices, salt, sugars, butter, eggs, vanilla, pureed winter squash (probably butternut, but who knows)

These muffins come together in just a few minutes, provided your butter is at room temperature. I’ve never made them with melted butter or another liquid fat, but I have substituted coconut oil (solid at room temperature) for the butter a few times. It adds a lovely coconut fragrance to the finished product, but right now the coconut oil’s just too much of a pain to dig out of the jar. And besides, I had butter out. This recipe uses a typical muffin mixing method – cream butter and sugar, add eggs one at a time and beat until incorporated before adding the next, add pumpkin, add dry ingredients, add chocolate chips. Portion, bake, eat.

All portioned out and ready to bake!

All portioned out and ready to bake!

An important technique note with any muffin, cake, or quick bread is to avoid overmixing. However, it’s not a big risk with whole wheat flour, since the bran and germ fragments tend to slice through the gluten strands and therefore you don’t get a whole lot of gluten development. Or at least that’s how I remember it working – it’s been a while since I read about that.

A word about portioning the batter: I like to use portion scoops for this job. Mostly because it’s easy and keeps my hands clean, but also because it helps me make sure that the muffins are all about the same size and therefore bake at the same rate. You can purchase portion scoops online or from your local restaurant supply store. You can get them in cookware shops too, but they’re generally going to be much more expensive there. Each one will have a number stamped on the sweep or handle, which tells you how many scoops of that size it’ll take to reach a quart (32 fluid ounces). I use a #40 for muffins (two scoops per muffin), a #60 or #70 for cookies, and a #90 for… well, I forget why I have that one. It was something interesting, I’m sure.

Done!

Ready to eat!

Pumpkin Chocolate Chip Muffins, from King Arthur Flour Whole Grain Baking

Makes 16-18 muffins

  • 2 cups (8oz) whole wheat flour
  • 1 tsp baking soda
  • 1/2 tsp baking powder
  • 1/2 tsp salt
  • 1/2 tsp cinnamon
  • 1/2 tsp ground cloves
  • 1/4 tsp ground nutmeg
  • 1/2 cup (1 stick, 4 oz) unsalted butter, at room temperature
  • 1 cup (7.5 oz) packed light or dark brown sugar
  • 1/4 cup (1.75 oz) granulated sugar
  • 3 large eggs
  • 1 tsp vanilla extract
  • 1 cup (9.5 oz) pumpkin puree, canned or fresh
  • 3/4 cup (4.5 oz) chocolate chips (or dried fruit if you prefer)
  • 3/4 cup (3 oz) chopped nuts (optional)

Preheat oven to 375° and grease muffin tins or line with muffin papers

In a medium bowl, combine flour, baking soda, baking powder, salt, cinnamon, cloves, and nutmeg. Set aside.

In mixer bowl, cream butter with both brown and granulated sugar until light and fluffy. Add eggs one at a time, fully incorporating one before adding the next. Scrape down bowl and beater between egg additions. Add pumpkin and mix to combine. Add dry ingredients and stir until mostly incorporated, then stir in chocolate chips.

Portion into muffin cups, filling each 2/3 full. A #40 portion scoop works well for this – two scoops fill the muffin cup to the right level. Bake 22-24 minutes and let cool for a few minutes before removing from pan. Store covered at room temperature.


Leave a comment

Chicken Noodle Soup with Homemade Noodles

I pulled out my trusty copy of Joy of Cooking today and nearly tore the cover off! It’s sporting a lovely stripe of duct tape now, while I figure out if there’s a better long-term solution for holding it together.

While I had it out, I figured I’d make egg noodles for tonight’s dinner. I frequently buy a rotisserie chicken on Tuesdays, since I have it in my head that it’s cheaper on Tuesdays. I don’t think it is, but whatever. It makes for an easy dinner. Since I had the noodles and chicken in mind, it only made sense to make my daughter’s favorite dinner.

To start, you take all-purpose flour, salt, and butter and pulse them in the food processor a bit. Then add whole eggs and egg yolks and run the processor until everything comes together. Knead by hand a couple times to bring it together, then form it into a disc and wrap in plastic. Put it in the fridge for a few hours to let the flour hydrate and let the gluten relax.

What my dough looked like after it's trip through the food processor.

What my dough looked like after its trip through the food processor.

About 40 minutes before you’re planning to eat, heat a tablespoon or so of butter and the same amount of olive oil in a large Dutch oven. Add diced onion, celery, and carrots, and minced garlic, along with a pinch of salt, and sweat until onions are translucent. Add chicken stock to cover everything (supplementing with water if you run out), bring to a simmer, and cook until the carrots are mostly tender.

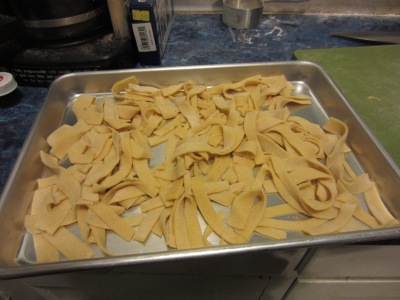
While the soup is simmering, start rolling out the noodles. Divide the dough into thirds and roll out on a liberally floured surface until it’s about 1/16″ thick. You’ll notice that it starts to spring back at some point, so fold the piece of dough in thirds and set aside while you roll out the other pieces of dough. You can ABSOLUTELY do this part with a pasta machine, but I didn’t feel like getting mine out and dealing with the hassle of finding a good place to clamp it down. And I feel like I’ve finally gotten the hang of rolling out dough after the approximately 923847 batches of sugar cookies I made for Christmas, so this was fun. Once you’ve rolled out all of the dough pieces, go back to the first one and roll it out a bit more. Cut it into pieces the desired length of your noodles, then stack them and slice to the desired width. You’ll want about 1/3 of the noodles for a 5/6 serving pot of soup, and you can freeze what you don’t use.

2/3 of the noodles, laid onto a pan for freezing.

2/3 of the noodles, laid onto a pan for freezing.

Once the carrots are tender, add your cooked chicken to the pot and check for seasoning. Bring to a boil and add the noodles, then simmer 3-4 minutes until they’re al dente. Finish with chopped parsley, if you’ve got it, and serve.

Ready to NOM.

Ready to NOM.

Leftovers, if you have them, reheat well.

Egg Noodles, from Joy of Cooking

  • 1 1/2 cups all purpose flour
  • 1/8 tsp salt
  • 1 TB + 1 tsp unsalted butter, cut into tiny pieces
  • 2 large eggs
  • 2 large egg yolks

Combine flour, salt, and butter in food processor and pulse to combine. Add eggs and yolks and process until dough forms. Remove from food processor and knead lightly to bring dough together, then form into a disc and wrap in plastic. Refrigerate at least one hour to allow gluten to relax.

Cut dough into thirds and roll out with plenty of flour, either by hand or in a pasta machine, until desired thickness. Cut to desired length and width.

Chicken Noodle Soup 

  • 1 TB butter
  • 1 TB olive oil
  • 1 onion, diced
  • 2 carrots, quartered lengthwise and cut into 1/4″ slices
  • 2 stalks celery, halved lengthwise and cut into 1/4″ slices
  • 2 cloves garlic, minced
  • 3 cups chicken stock, homemade or commercially produced
  • 1/3 recipe egg noodles, above, or commercially produced egg noodles (dry noodles will take longer to cook)
  • 1-2 cups cooked chicken
  • salt and pepper to taste
  • parsley

Sweat vegetables in fat with a pinch of salt until onions are translucent. Add stock, plus water as needed to cover ingredients. Bring to simmer and cook until carrots are tender. Season to taste and add chicken, then bring to a boil and add noodles. Cook until tender, 3-4 minutes for fresh noodles or following package directions for commercial noodles. Finish with minced parsley and serve.


Leave a comment

Picky Eater Meatloaf

I’ve got a picky eater. He hasn’t always been this way – this is the kid who, as a toddler, would eat all the cherry tomatoes off the plant regardless of ripeness, ate a mushroom he found growing in the yard, and devoured an entire (quite bitter) cucumber at the farmer’s market.

OMNOMNOMNOM

OMNOMNOMNOM

But once he turned four or so, it became a real challenge to get him to eat. He has some sensory processing issues, which are undoubtedly one of the root causes of the pickiness, but he’s also just a very stubborn kid who resists doing anything that isn’t something he really enjoys. He’s 7.5 now and in the last few months has been showing some willingness to try new foods. I suspect that part of it is due to peer pressure at school – everyone else in his class gets hot lunch so he wants to too, and in order to survive the day he *has* to eat the things he doesn’t like.

A couple Christmases ago we were given two different versions of this Star Wars cookbook and he’s pulled them out from time to time and asked us to make something. Usually it’s a dessert, but a couple weeks ago he had it out and asked us to make the “Han-burgers”. Well, if the kid asks for hamburgers for dinner we’ll certainly oblige! We made them with ground bison, because that’s what’s in the freezer, and he wolfed his down. Turns out he not only likes hamburgers, but he likes them rare and with a little garlic in them. Good kid.

Not to be outdone in getting special meal requests in, my daughter (nearly 10) asked for meatloaf the other night. Again, I can’t say no to that! When I was a kid, meatloaf was one pound of ground beef, one egg, and one package of Lipton onion soup mix, all mixed together and plopped into a loaf pan. It was just fine, and I loved it, but I make my meatloaf a bit differently. I like some veggies in my meatloaf – sauteed onions, garlic, and grated carrots and blanched and chopped greens, and I mix the beef or bison 50/50 with ground pork to improve the texture and add some fat. There’s an egg and bread crumbs or crushed crackers to bind it together, and a ketchup glaze on top just because.

No, it's not photogenic. But it IS delicious.

No, it’s not photogenic. But it IS delicious.

So I made this meatloaf and while it was in the oven Arlo started asking for food. He insisted he didn’t like meatloaf, but Chris sat him down and told him that it was a lot like a hamburger. He was skeptical and wanted a bun for his slice, but since we didn’t have any he eventually ate it without bread (but with a lot of ketchup, since he’s 7). I was pretty shocked to see that slice disappear in short order, and a few bites of mashed potatoes as well! Grace devoured two slices and no potatoes, but she’s generally a good eater so I don’t tend to make much fuss when she eats whatever it is I cook.

I’ve been eating this cold for breakfast for a couple days and it’s pretty good that way. I’ll make some hash with it for lunch today, probably, since we still don’t have bread for sandwiches (though bread’s on the agenda, I think).

Picky Eater’s Meatloaf

  • 1 lb ground beef or bison, at room temperature
  • 1 lb ground pork, at room temperature
  • 2 TB lard, bacon fat, butter, or cooking oil
  • 1 large onion, minced
  • 3 cloves garlic, minced
  • 2 large carrots, grated
  • 1 bunch kale, spinach, or other hearty green, blanched, squeezed, and finely chopped
  • 1 large egg
  • 3/4 cup bread crumbs or crushed saltines
  • 3 TB chopped parsley
  • 1 tsp dried thyme
  • 1/4 tsp chipotle (this amount just adds a little smoky flavor, add more if you like heat)
  • 1 tsp salt
  • 1/2 tsp pepper
  • ketchup

Preheat oven to 350°

Saute onion in fat until translucent, then add garlic and carrots and cook for a few more minutes, until the carrots begin to soften. Transfer to a large bowl and stir in greens, bread crumbs, and seasonings. Once the veggies have cooled, mix in the ground meats and the egg until you’ve got a fairly homogeneous mixture. Transfer to a rimmed baking sheet and form into two loaves, about 2″ high and 3-4″ across. Brush with ketchup and put into the preheated oven. Bake until internal temperature reaches 160°, about 45-50 minutes. Let rest a few minutes before cutting, then dig in!

For a delicious variation, wrap the loaves with thick-cut bacon after you brush on the ketchup. If the bacon starts to get too done in baking, cover lightly with greased tinfoil for the remainder of the baking time.


Leave a comment

Boozy Cupcakes

I’ve been slacking something fierce, foodwise, lately. Partly thanks to my 9yo’s broken elbow (she’s fine but will be in a cast until the end of the year), partly thanks to the fact that I lose track of pretty much everything at this time of year. We’ve been eating a lot of quesadillas and leftovers, with the kids going through embarrassing amounts of boxed macaroni and cheese. I’ll get my cooking mojo back eventually.

Chocolate-whiskey cupcakes, aka car bomb cupcakes

Chocolate-whiskey cupcakes, aka car bomb cupcakes

But in the meantime, we have cupcakes. We’re going to a house concert by one of our favorite musicians, Jeremy Messersmith, and he’s had the brilliant (if rather intimidating) idea to make it a dinner party sort of thing where everybody brings potluck-type foods. Most of my favorite savory dishes don’t lend themselves to potlucks, so I elected to go with the cupcakes that have sort of become my signature potluck item. Turns out that the recipe was originally posted over at Smitten Kitchen in 2009 – I didn’t think I’d been making them that long, but I guess I have.

The idea of boozy cupcakes, as I tend to call them, is a lot of fun – there’s stout in the cupcakes themselves, then irish whiskey in the ganache that’s plopped into the center, then Bailey’s in the frosting. I love the flavors and textures of this, with the smooth rich bomb of whiskey-laced ganache in the middle of the cupcake. I generally don’t call them “Car Bomb Cupcakes” although that’s the drink they’re modeled on, because I’ve heard that the term can be offensive. “Chocolate Stout Cupcakes with Whiskey Ganache Filling and Irish Cream Frosting” is too much of a mouthful, so I just say “Boozy Cupcakes” and everyone’s happy.

I make the recipe as written, except that I add extra cream and whiskey to the ganache and more Bailey’s to the frosting. And I scoop out the cupcake centers with a melon baller, because that cookie cutter thing she suggests just didn’t work for me. Oh, and the centers of the cupcakes are sunken every time I make them, no matter what I do. I think it’s something to do with the recipe but it’s just not enough of a problem for me to rewrite the thing – the centers get scooped out anyhow, so it doesn’t really matter if they’re sunken.

I ended up doubling the frosting today since I must have applied more per cupcake than usual, and they’re topped with edible ball bearings because I’m one of those people who makes random Doctor Who references now.


3 Comments

The Joy of Cooking and Butterscotch Pudding

Growing up, we basically had two cookbooks in the house – The Joy of Cooking and The Male Chauvinist’s Cookbook (sadly without that hilarious cover). The Joy of Cooking covered almost all of my early cooking experience, backed up by the array of recipes in my mom’s recipe box (including “Alice B. Toklas Brownies”, which had an interesting herbal component), so it only made sense that I should get a copy of it when I got my own place.

In 1997, when I got my first apartment, they had just rereleased Joy of Cooking, so that’s the version I have. Sadly, it’s the first edition to omit the directions and hilarious illustration for skinning a squirrel – I suppose the Rombauer family didn’t foresee the resurgence of “Chicken of the Trees” in foodie circles. A shame, that. I’m on the lookout for a squirrel hunting experience, by the way – hit me up if you’re in the Twin Cities area and are open to someone tagging along.

Anyhow. One of the first recipes I remember making after getting this is the butterscotch pudding, on page 1019. My book automatically opens to that page now:

Clearly a well-loved book.

It’s a super simple recipe. I honestly have no idea what inspired me to make it for the first time, since butterscotch is kind of a “meh” thing for me, but I’m glad I did – it’s the source of one of my favorite stories. Chris and I had just been married for a few months at that point and we had a friend who frequently came to hang out. One night I pulled a batch of this butterscotch pudding out of the fridge and our friend dug in, ate the whole serving in a few bites, and asked me to marry him. We all got a good laugh out of that. Ever since, I make this recipe from time to time because it makes me laugh. And also because it’s really *really* good.

It’s a very straightforward recipe, which is nice. You melt butter and mix in dark brown sugar, then cook it for a few minutes until it’s bubbly. Add cream to dissolve the caramel, then milk and a pinch of salt. Thicken with a cornstarch slurry, then stir in vanilla and chill.

Ingredients, minus the horribly unphotogenic cornstarch slurry.

That’s a little bit of molasses on top of the brown sugar, since I ran out of dark brown sugar and wasn’t about to run to the store just for that. Turns out I was also out of milk, but half and half made a passable substitution. And now I have to go to the store for real, because if there’s no half and half in the house tomorrow morning, things will be fairly ugly.

Butterscotch! You’ll want yours a fair bit darker than this. I should have caramelized this more, in retrospect.

If you, like me, run out of dark brown sugar and substitute light brown sugar, make sure you caramelize it a bit more than this. I was distracted and following directions instead of observing – your eyes, ears, mouth, and sense of smell are as important in cooking as the actual recipe.

Once you’ve added in the dairy products, you’ll want to slowly whisk about 1/4 of the caramel sauce into your cornstarch slurry. This slowly raises the temperature of the starch so it doesn’t seize up when you add it to the pot. Once you’ve tempered the cornstarch (what you just did!), whisk it back into the pot and cook over low heat until it thickens. Make sure you whisk/stir this constantly to avoid burning and uneven thickening.

Here’s where I confess that I screwed up – Joy tells you to let the caramel sauce cool before adding the cornstarch slurry directly to the pot. I’ve always modified this to save a little time and done what I discussed in the previous paragraph. My brain’s somewhere else today, and I remembered the part about not waiting for the caramel to cool before thickening it, but not the part about tempering it into the cornstarch. Therefore, I whisked the cornstarch slurry directly into the boiling caramel sauce. As you might imagine, I ended up with a somewhat curdled pudding. In an effort to salvage it, I passed it through a sieve before stirring in the vanilla. It worked, mostly. The texture is nowhere near as creamy smooth as usual, and combined with my failure to cook the caramel long enough I’ve got a tasty but not mind-blowing end product. With enough whipped cream it’ll be fantastic, though.

Lumpy texture in evidence

Cover this with plastic wrap, laying the wrap directly on the surface of the pudding (unless you’re someone who likes their pudding with a skin on top, which I’ve heard is a thing). Refrigerate for several hours before digging it.

Butterscotch Pudding, adapted from Joy of Cooking

  • 3TB unsalted butter
  • 1/2 cup dark brown sugar, packed
  • 1/2 cup heavy cream
  • 1 1/2 cups whole milk
  • 1/4 tsp salt
  • 3 TB cornstarch
  • 3 TB water
  • 1 tsp vanilla extract


In a heavy pot, melt butter. Stir in brown sugar and cook until dark brown and bubbly, stirring frequently. Reduce heat and stir in heavy cream, stirring until the butterscotch is dissolved. Stir in milk and salt and remove pan from heat. In a heatproof bowl, stir cornstarch and water together. Slowly whisk in about 1/4 of the milk/butterscotch mixture, then whisk back into the pot. Over medium heat, cook pudding until it boils and thickens, stirring constantly to prevent sticking. Remove from heat and stir in vanilla, then divide pudding between four custard cups, covering with plastic wrap placed directly on the surface of the pudding. Refrigerate for 2-4 hours before eating. Serve with whipped cream.


Leave a comment

Beefy Borscht

There’s something about the middle of November that just screams “make soup EVERY DAY!”, and who am I to deny an urge like that? I had some stew meat thawed and awaiting inspiration, along with beets, cabbage, and – oh hey – some beef marrowbones in the freezer. CLEARLY it was time to make borscht. Now, I’ve only actually had chunky (Russian-style) borscht once, and I wasn’t eating beef at the time, so this is my interpretation of it with some help from my favorite cookbook ever, The Joy of Cooking.

To start, I had to turn those bones into broth, which I hadn’t done since cooking school. Everything I read said to just put bones in water at first, since they throw off so much scum. They were NOT kidding. The only thing I wish I’d done differently was to have also put the stew meat in with the bones – I added them later, with the veggies, and ended up with a lot of gunk in the broth that I just couldn’t scoop out. Oops.

Not clear and pretty like I wanted, sadly.

So you simmer the bones/meat until they stop throwing off scum (which you need to scoop out with a skimmer of some sort), then you add your vegetables. I threw in an onion, unpeeled and cut into eighths, a couple chopped carrots, a couple celery ribs, a couple garlic cloves, parsley, peppercorns, bay, clove, thyme. Keep this at a bare simmer for as long as you can – the longer you cook it, the more collagen dissolves from the meat and bones, plus there are a lot of vitamins and minerals that leach out of the bones. Strain it and chill it if you’re not going to use it right away. Pick the meat out from your pile of bones and spent veggies and reserve it for the soup.

When you’re ready to make the borscht, you’ll want to gather up the following: beets, cabbage, carrots, potatoes, onion, garlic, canned tomatoes, tomato paste. Start by boiling the beets until they’re tender, at which point you can just slip the skins off. Set them aside to cool. Melt some fat (butter’s good, and I augmented it with some of the fat skimmed from the stock) in your biggest soup pot and throw in a sliced onion. Cook that for a bit and add sliced garlic, then a couple tablespoons of tomato paste. Cook that for a bit to concentrate the flavor, then throw in chopped cabbage, potatoes, and carrots. Saute for a couple minutes, adding a good bit of salt, then add your broth and a can (or jar, if you’ve canned your own) of whole tomatoes with juice. Bring it up to a boil and then simmer until the potatoes and carrots are tender. At that point, cut up your cooked beets and toss them in, along with the meat reserved from the broth. You might need to add extra water to thin out the soup (I did!) – you want this to be fairly brothy.

This really needed more water added to it, but I was nearly out of room in the pot!

Traditionally, borscht is served with sour cream and fresh dill. I have creme fraiche (SUPER DUPER EASY TO MAKE YOUR OWN!) and dried dill – they certainly made for a more-than-passable garnish for the soup.

All set to eat!

I just ate breakfast and now I’m hungry again. I think I know what’s for lunch!

Borscht

  • 2 quarts beef broth, either homemade or purchased (chicken stock is fine, too)
  • 2 TB butter or other fat
  • 1 medium onion, halved and sliced into 1/8″ pieces
  • 2 cloves garlic, sliced
  • 2 TB tomato paste
  • 1/4 head cabbage, sliced thinly
  • 2 carrots, halved lengthwise and cut into 1/2″ chunks
  • 2 medium potatoes (yukon gold or red are good choices here), halved and cut into 1/2″ pieces
  • 1 28oz can whole tomatoes in juice
  • 3 medium beets, boiled, peeled, and sliced into 1/4″ chunks
  • 1-2 cups cooked beef (simmer stew meat in commercial broth until tender before starting the soup if you don’t make your own stock)
  • juice of 1/2 lemon
  • sour cream or creme fraiche and fresh or dried dill fronds for garnish

Melt butter/fat in a large pot and saute sliced onion until softened. Add sliced garlic and cook until fragrant. Add tomato paste and stir for a couple minutes, until slightly darkened. Add sliced cabbage, carrots, and potatoes, then tomatoes (break them up with your hands first) and broth. Bring to a boil, then reduce heat and simmer until potatoes and carrots are barely tender. Add cooked beets and beef and simmer 15 minutes to heat through and meld flavors. Finish with lemon juice and salt and pepper to taste.

Serve, garnishing with sour cream/creme fraiche and dill.